Nox
Nox T3 Instructions for Patient
- The equipment you have been issued with has your details already programmed into the device.
- Please remove any nail varnish or acrylic nails prior to performing the test.
- We ask you to wear the device over clothing, for example a Pyjama top or a clean t shirt so that it is not next to your skin.
- The majority of the sensors should already be connected for you.
- Please do not smoke while wearing the equipment.
- Please take you medication as usual, unless instructed to do so.
- Please be aware this device records live audio
- Be aware we need at least 4hours for a study to be valid.
Set Up
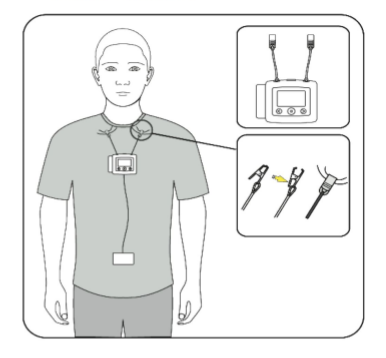
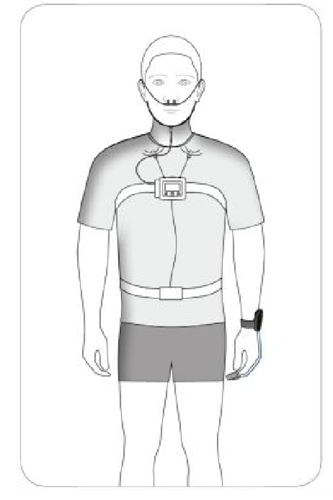
- Position the Nox T3 Monitor
- Using the crocodile clips, clip the Nox T3 device to your clothing.
- Roll the excess abdominal cable attached to the abdomen sensor around the abdomen sensor itself until the length bring it up to roughly your belly button.
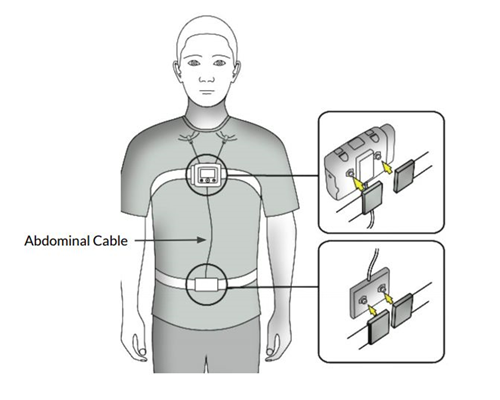
2. Connect the Belts
- On the belt there are two gold pegs, clip one of the pegs into the back of the T3 device, wrap the belt around your chest, underneath the armpits, and clip the other end of the belt into back of the T3 device using the other gold peg.
- Connect the abdomen belt using the two gold pegs, clip one of the pegs into the back of the abdomen sensor, wrap the belt around your waist, and clip the other end of the belt into back of the abdomen sensor using the other gold peg.
- Both belts should be “snug” but not uncomfortable, you can adjust the tension by pulling the belts through the front clips. Ensure the belts are not twisted.
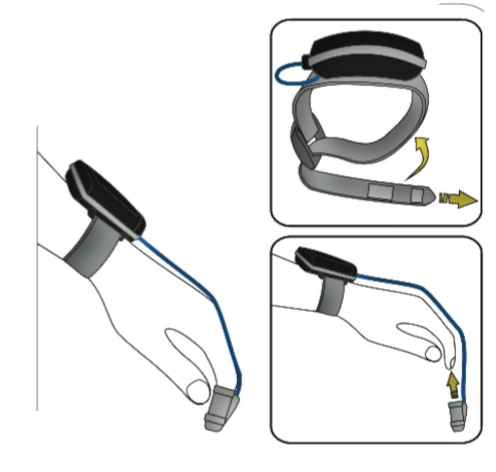
2. Connect the Pulse Oximeter & Finger Probe
- Put the Oximeter on your wrist, preferably on the opposite side that you sleep, wrap the Velcro strap around your wrist to secure it.
- Place the finger probe onto any finger (the finger nail should not have nail varnish or acrylic nail on).
- The cable will rest on top of the finger and along the back of your hand.
- Tape the wire to you hand to secure it into place.
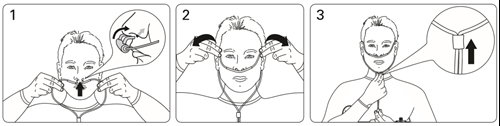
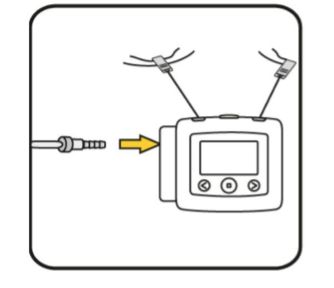
4. Connect The Cannula
- Loop the cannula around the ears and under your chin. The nasal prongs should be facing upwards inside the nostril. Adjust the slider under your chin to secure it into place. Tape the cannula to your face to secure it further.
- Push the cannula into the pressure input on the side of T3 Device.
5. Turning The T3 On.
- You do not have to power the device on as it will automatically turn on at 10pm, unless otherwise arranged. The display screen will go blank but the device will still be recording. The oximeter will automatically pair with the T3 device.
6. Go to bed – Please sleep in you natural sleeping position.
7. If you need the toilet during the night, leave the device running but remove the finger probe to wash your hands.
Troubleshooting
If an X appears on the display screen, it means that the pairing has been unsuccessful; please turn the device off and back on by pressing the power button, a tick should then appear on the screen
In The Morning
- When you are done sleeping, remove the sensors and the device.
- The device will turn off automatically.
- Throw the cannula and tape away. Throw the belts away.
- Return the device, the oximeter and the abdomen sensor back to the box.
- Complete all paperwork and questionnaires.
RETURN THE NOX T3 & QUESTIONNAIRES AS ARRANGED.
Nox T3 Instructions for Patient
- The equipment you have been issued with has your details already programmed into the device.
- Please remove any nail varnish or acrylic nails prior to performing the test.
- We ask you to wear the device over clothing, for example a Pyjama top or a clean t shirt so that it is not next to your skin.
- The majority of the sensors should already be connected for you.
- Please do not smoke while wearing the equipment.
- Please take you medication as usual, unless instructed to do so.
- Please be aware this device records live audio
- Be aware we need at least 4hours for a study to be valid.
Set Up
- Position the Nox T3 Monitor
- Using the crocodile clips, clip the Nox T3 device to your clothing.
- Roll the excess abdominal cable attached to the abdomen sensor around the abdomen sensor itself until the length bring it up to roughly your belly button.
2. Connect the Belts
- On the belt there are two gold pegs, clip one of the pegs into the back of the T3 device, wrap the belt around your chest, underneath the armpits, and clip the other end of the belt into back of the T3 device using the other gold peg.
- Connect the abdomen belt using the two gold pegs, clip one of the pegs into the back of the abdomen sensor, wrap the belt around your waist, and clip the other end of the belt into back of the abdomen sensor using the other gold peg.
- Both belts should be “snug” but not uncomfortable, you can adjust the tension by pulling the belts through the front clips. Ensure the belts are not twisted.
3. Connect the Pulse Oximeter & Finger Probe
- Put the Oximeter on your wrist, preferably on the opposite side that you sleep, wrap the Velcro strap around your wrist to secure it.
- Place the finger probe onto any finger (the finger nail should not have nail varnish or acrylic nail on).
- The cable will rest on top of the finger and along the back of your hand.
- Tape the wire to you hand to secure it into place.
4. Connect The Cannula
- Loop the cannula around the ears and under your chin. The nasal prongs should be facing upwards inside the nostril. Adjust the slider under your chin to secure it into place. Tape the cannula to your face to secure it further.
- Push the cannula into the pressure input on the side of T3 Device.
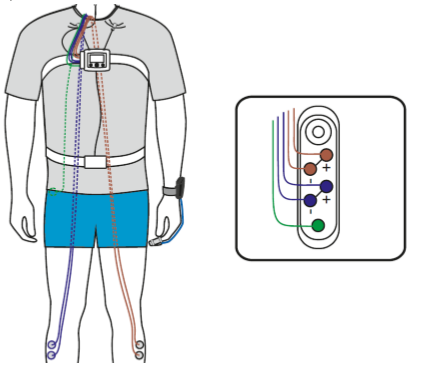
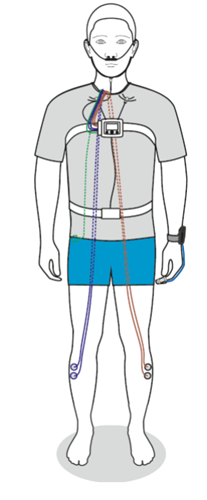
5. Attaching Leg Leads
- Remove the protective plastic from the leg electrode and place the gel against the skin. Put tape across the wires to secure them further.
- 2 Electrodes go into Input 1 in the T3 device, goes to the left leg
- 2 Electrodes go into Input 2 in the T3 device, goes to the right leg
- 1 Ground Electrode goes into Input PGND, this should be positioned on the hip bone.

6. Turning The T3 On.
- You do not have to power the device on as it will automatically turn on at 10pm, unless otherwise arranged. The display screen will go blank but the device will still be recording. The oximeter will automatically pair with the T3 device.
7. Go to bed – Please sleep in you natural sleeping position.
8. If you need the toilet during the night, leave the device running but remove the finger probe to wash your hands.
Troubleshooting
If an X appears on the display screen, it means that the pairing has been unsuccessful; remove the batteries from the oximeter for at least 30 seconds, please turn the T3 device off and back on by pressing the power button, a tick should then appear on the screen
In The Morning
- When you are done sleeping, remove the sensors and the device.
- The device will turn off automatically.
- Throw the cannula and tape away. Throw the belts away.
- Return the device, the oximeter and the abdomen sensor back to the box.
- Complete all paperwork and questionnaires.
RETURN THE NOX T3 & QUESTIONNAIRES AS ARRANGED.
Nox T3 Instructions for Patient
- The equipment you have been issued with has your details already programmed into the device.
- Please remove any nail varnish or acrylic nails prior to performing the test.
- We ask you to wear the device over clothing, for example a Pyjama top or a clean t shirt so that it is not next to your skin.
- The majority of the sensors should already be connected for you.
- Please do not smoke while wearing the equipment.
- Please take you medication as usual, unless instructed to do so.
- Please be aware this device records live audio
- Be aware we need at least 4hours for a study to be valid.
Set Up
- Position the Nox T3 Monitor
- Using the crocodile clips, clip the Nox T3 device to your clothing.
- Roll the excess abdominal cable attached to the abdomen sensor around the abdomen sensor itself until the length bring it up to roughly your belly button.


2. Connect the Belts
- On the belt there are two gold pegs, clip one of the pegs into the back of the T3 device, wrap the belt around your chest, underneath the armpits, and clip the other end of the belt into back of the T3 device using the other gold peg.
- Connect the abdomen belt using the two gold pegs, clip one of the pegs into the back of the abdomen sensor, wrap the belt around your waist, and clip the other end of the belt into back of the abdomen sensor using the other gold peg.
- Both belts should be “snug” but not uncomfortable, you can adjust the tension by pulling the belts through the front clips. Ensure the belts are not twisted.
3. Connect the Pulse Oximeter & Finger Probe
- Put the Oximeter on your wrist, preferably on the opposite side that you sleep, wrap the Velcro strap around your wrist to secure it.
- Place the finger probe onto any finger (the finger nail should not have nail varnish or acrylic nail on).
- The cable will rest on top of the finger and along the back of your hand.
- Tape the wire to you hand to secure it into place.
4. Connecting the CPAP to the Sleep Study Device
- This piece of equipment fits between the mask and tube. The wider circumference goes into the mask, the narrower end goes into the tube.
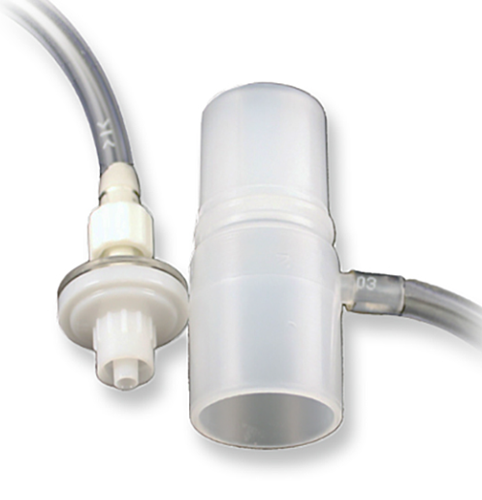
- Screw the CPAP connector clockwise into top of the sleep study device you have been issued with instead of a nasal cannula.
- Use your CPAP as normal.
- Please return this with the rest of your sleep study equipment.
- Ensure you tick CPAP used on your Post Sleep Questionnaire
5. Turning The T3 On.
- You do not have to power the device on as it will automatically turn on at 10pm, unless otherwise arranged. The display screen will go blank but the device will still be recording. The oximeter will automatically pair with the T3 device.
6. Go to bed – Please sleep in you natural sleeping position.
7. If you need the toilet during the night, leave the device running but remove the finger probe to wash your hands.
Troubleshooting
The CPAP connector is compatible with all masks, if the connector will not fit please ensure there is no hard plastic in the tube, if there is, this is part of the mask, please reattach it to the mask and try again, follow the instruction above.
If an X appears on the display screen, it means that the pairing has been unsuccessful; please turn the device off and back on by pressing the power button, a tick should then appear on the screen
In The Morning
- When you are done sleeping, remove the sensors and the device.
- The device will turn off automatically.
- Throw the belts away.
- Return the device, the oximeter and the abdomen sensor back to the box.
- Complete all paperwork and questionnaires.
RETURN THE NOX T3 & QUESTIONNAIRES AS ARRANGED.
Nox T3 Instructions for Patient
- The equipment you have been issued with has your details already programmed into the device.
- Please remove any nail varnish or acrylic nails prior to performing the test.
- We ask you to wear the device over clothing, for example a Pyjama top or a clean t shirt so that it is not next to your skin.
- The majority of the sensors should already be connected for you.
- Please do not smoke while wearing the equipment.
- Please take you medication as usual, unless instructed to do so.
- Please be aware this device records live audio
- Be aware we need at least 4hours for a study to be valid.
Set Up
- Position the Nox T3 Monitor
- Using the crocodile clips, clip the Nox T3 device to your clothing.
- Roll the excess abdominal cable attached to the abdomen sensor around the abdomen sensor itself until the length bring it up to roughly your belly button.
2. Connect the Belts
- On the belt there are two gold pegs, clip one of the pegs into the back of the T3 device, wrap the belt around your chest, underneath the armpits, and clip the other end of the belt into back of the T3 device using the other gold peg.
- Connect the abdomen belt using the two gold pegs, clip one of the pegs into the back of the abdomen sensor, wrap the belt around your waist, and clip the other end of the belt into back of the abdomen sensor using the other gold peg.
- Both belts should be “snug” but not uncomfortable, you can adjust the tension by pulling the belts through the front clips. Ensure the belts are not twisted.
3. Connect the Pulse Oximeter & Finger Probe
- Put the Oximeter on your wrist, preferably on the opposite side that you sleep, wrap the Velcro strap around your wrist to secure it.
- Place the finger probe onto any finger (the finger nail should not have nail varnish or acrylic nail on).
- The cable will rest on top of the finger and along the back of your hand.
- Tape the wire to you hand to secure it into place.
4. Connecting the CPAP to the Sleep Study Device
- This piece of equipment fits between the mask and tube. The wider circumference goes into the mask, the narrower end goes into the tube.
- Screw the CPAP connector clockwise into top of the sleep study device you have been issued with instead of a nasal cannula.
- Use your CPAP as normal.
- Please return this with the rest of your sleep study equipment.
- Ensure you tick CPAP used on your Post Sleep Questionnaire.
5. Attaching Leg Leads
- Remove the protective plastic from the leg electrode and place the gel against the skin. Put tape across the wires to secure them further.
- 2 Electrodes go into Input 1 in the T3 device, goes to the left leg
- 2 Electrodes go into Input 2 in the T3 device, goes to the right leg
- 1 Ground Electrode goes into Input PGND, this should be positioned on the hip bone.
6. Turning The T3 On.
- You do not have to power the device on as it will automatically turn on at 10pm, unless otherwise arranged. The display screen will go blank but the device will still be recording. The oximeter will automatically pair with the T3 device.
7. Go to bed – Please sleep in you natural sleeping position.
8. If you need the toilet during the night, leave the device running but remove the finger probe to wash your hands.
Troubleshooting
The CPAP connector is compatible with all masks, if the connector will not fit please ensure there is no hard plastic in the tube, if there is, this is part of the mask, please reattach it to the mask and try again, follow the instruction above.
If an X appears on the display screen, it means that the pairing has been unsuccessful; remove the batteries from the oximeter for at least 30 seconds, please turn the T3 device off and back on by pressing the power button, a tick should then appear on the screen
In The Morning
- When you are done sleeping, remove the sensors and the device.
- The device will turn off automatically.
- Throw the belts away.
- Return the device, the oximeter and the abdomen sensor back to the box.
- Complete all paperwork and questionnaires.
RETURN THE NOX T3 & QUESTIONNAIRES AS ARRANGED.
How to fit your Nox T3 device Diagnostic
How to fit your Nox T3 home sleep equipment from UHNM My HR on Vimeo.